Technical Library
STRINGING X: Replacing a revival-style double string
Entire Contents Copyright © 2021 CBHTechnical LibrarySTRINGING X: Replacing a revival-style double string Entire Contents Copyright © 2021 CBH |
Replacing a revival-style double string…
Some instruments are not strung with individual hitchpin loops, but rather in modern piano style where the one length of wire doubles around the hitchpin—often of larger diameter than usual—to return to another tuning pin as a distinctly separate string. This arrangement is commonly found in John Storrs kit instruments; Morley instruments including their clavichords; and the early Zuckermann double-strung clavichord kits.
I’m not convinced of any advantage of this stringing system. In fact, there are several disadvantages: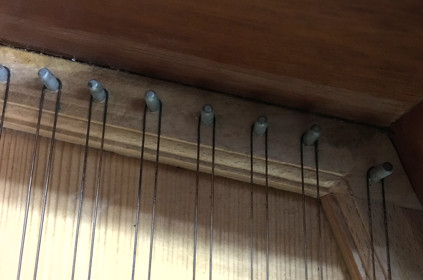 CAREY BEEBE |
| Bass stringing on a Morley revival harpsichord |
A special technique is required to replace such strings. It’s quite challenging to be able to replicate the neatness of the original stringing of these instruments without some experience. While the method required might appear similar to that used by modern piano tuner/technicians, their large diameter and very stiff steel piano wire can withstand rough treatment with the special tools they use, that would too easily weaken and break the smaller diameters and non-ferrous alloys used for stringing harpsichords and clavichords.
Modern piano tuners avoid removing their tuning pins from the wrestplank at all cost, but just unscrew them the required 3.5 turns. For early keyboard instruments, though, the pins should be removed because it is almost impossible to control the small diameter wire in the restricted space of the wrestplank layout, particularly on clavichords. The latter instrument enjoys the added complication of its listing cloth to deal with, and possibly a listing board as well.
The following instructions are for a revival clavichord. To use this string replacement technique on a revival harpsichord, you can proceed as below, but ignore any reference to the listing. You will obviously need to remove the jackrail, and also have your replacement strings track around their correct nut pins as well as bridge pins. You may find it easier to remove the jacks for those notes so you have some more space.
1. Remove both tuning pins from the wrestplank by unscrewing them with the tuning hammer. Don’t mix them up, but just keep them loosely in their holes for now.
| NEVER USE PLIERS TO REMOVE THE TUNING PIN! YOU WILL BE SURE TO SCAR AND SPOIL IT. |
2. Unwind the residue of the broken string coil from around the pin. This will give you the required length for your replacement winding around the tuning pins, which will obviously be longer for the finer treble sizes than for the bass.
3. Remove the clavichord listing board and put it aside before gently pulling up the ruffle listing around the broken note to create some space.
4. Select the correct wire diameter and material for your replacement string. Unwind the full double length required from hitchpin to tuning pin, plus at least 500mm.
5. Secure one end of the wire. If you don’t have an assistant on hand to hold the other end, figure out a simple clamping arrangement.
6. Take the bass-most vacant tuning pin and thread the very end of the wire through the hole in the pin, leaving at least 50mm poking out.
7. Noting that the string must leave on the right of the tuning pin, roll the wire down the pin in close turns, until you have about the required number of turns to match the adjoining notes. Do not allow the wire to cross on top of itself!
| STRINGS ALWAYS LEAVE THEIR TUNING PINS ON THE RIGHT HAND SIDE, SO ROTATING THE TUNING HAMMER CLOCKWISE WILL ALWAYS RAISE THE PITCH. |
8. Now comes the tricky part. You must hold the wire on the tuning pin, retaining the musical end at some tension because if you let go, it is likely to spring off the pin, and you will have to start again. Cleanly break off the excess short length of wire by repeatedly bending it around in a large arc.
9. Return the pin to its hole in the wrestplank and push it down so it will hold there, always keeping sufficient tension on the musical end. The pin need not be at its finished height yet, just tight enough in its hole to hold during your subsequent work.
 CAREY BEEBE |
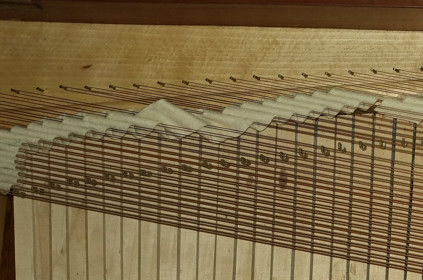
| Hitchpin & listing arrangement on a small revival clavichord by Morley |
10. Draw the wire towards the hitchpin end, running it around the correct bridge pin. Make a very loose bend to poke under the dislodged ruffle listing, always keeping the wire running to your first pin under tension so the windings stay neat on the pin.
11. Come around the hitchpin from the bass side with a 180° change of direction, pull the wire reasonably tight, and keep it tight.
12. You already have the loose musical length of the second string under the listing. Always retaining the tension, now bring this single wire back towards the wrestplank end of the instrument, and locate it around its relevant bridge pin.
13. Remove the second tuning pin, and thread the end of the wire through its hole. You want to replicate close to the same number of turns as the original stringing, which will preserve the downbearing intended by the maker. If you unwound the broken fragment remaining on the pin, you have an idea of the length of wire you need beyond the hole in the wrestplank. That is where you will begin winding the pin.
14. Proceed to wind the wire neatly down the tuning pin in close turns, until you get over its hole in the wrestplank. Break off the excess wire by repeatedly bending it around in a large arc.
15. Press the tuning pin into its hole, then gently tap both tuning pins down to almost the same height as their neighbours.
16. Confirm you have both strings tracking correctly over the bridge.
17. Return the dislodged ruffle listing in your string replacement area, poking it between the pairs of strings.
18. Gently raise the note to pitch, turning each tuning pin alternately so there is not too much difference of tension between both parts of the wire at any time, which would upset things at the hitchpin end.
19. If the two tuning pins you have removed are by now not at exactly the same height as the surrounding originals, gently tap them in until they are, and retune.
20. Replace the listing board, and you are done.
| Technical Library overview | |
| Harpsichords Australia Home Page |