Technical Library
STRINGING VI: Preparing to wind a hitchpin loop
Entire Contents Copyright © 2010 CBHTechnical LibrarySTRINGING VI: Preparing to wind a hitchpin loop Entire Contents Copyright © 2010 CBH |
Preparing to wind a hitchpin loop…
After selecting your replacement wire, you’re ready to make the loop: Leave the tuning pin in its hole until you have your loop made: It’s safe there.
You need to establish a decent clamping arrangement for the wire. This could just be another person grasping the coil quite firmly, or a more elaborate affair with a little clamp (padded, of course) on a piece of solid furniture and the wire running through leather or cloth. Professional makers string whole instruments rapidly from bulk coils, passing the wire through a “wire break” to hold it at the desired tension. Out in the field, I often use the ball of my left foot, but if you want to try that trick, you must be very careful not to kink the wire.
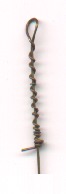
Winding a loop is not as difficult as playing a simple piece of music, and is a handy skill to cultivate. Use your practice coil rather than waste your good replacement wire, and wind a few loops until you are happy with your technique: Don’t make them look like this reject shown at the right, an original string from a harpsichord which was recently restrung. Notice how the straight central core is clearly visible: String loops wound like this are just going to collapse like a noose, rather than stay in tune.
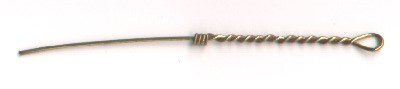
I’m going to ask you to aim for a nicely wound double helix like that shown in the enlargement shown top left. You can clearly see both parts of the wire wrapped securely around each other. The technique is all in the tension and angles that you control when you hold the wire and tuning hammer to twist both parts of the wire together.
If the style of loops on your instrument don’t look close to the one above, flip ahead and see the alternate loops.
| Technical Library overview | |
| Harpsichords Australia Home Page |