Technical Library
KEYBOARDS VI: Key Alignment
Entire Contents Copyright © 2012 CBH
Technical LibraryKEYBOARDS VI: Key Alignment Entire Contents Copyright © 2012 CBH |
Aligning the keys…
The harpsichordist’s physical connection with the instrument is solely through the keyboard: If the keyboard doesn’t feel right, the control of the musician is reduced and the quality of performance compromized.
The keys of the harpsichord must always be correctly aligned, although to judge by what is delivered new, some makers are more particular about this than others. Even though the best keyboards are cut from a single well-seasoned plank made of several glued up flitches, the wood can move, particularly if the instrument has found a new home. Some keyboards can be pretty wild and continue to move for several years. In a misguided effort to increase stability, makers have produced keys laminated from two or three layers, or made from plywood or MDF.
To ensure perfect alignment and operation, three separate adjustments must be made from time to time in order of tilt, spacing and level.
My friend and colleague San Francisco harpsichord maker Kevin Fryer calls this process “taking the keyboard to the orthodontist”. Another US colleague well-earned the nickname "Whizzy” because of the extraordinary length of time he would take to fuss over just the leveling of a keyboard—many times longer than possible if he was running his own business and expected a musician to pay for work done, rather than drawing a regular weekly wage.
Adjusting the tilt, level and spacing of a keyboard might rightly take from 0.25 to 2 hours depending on quality of make and keyboard condition, with less than 1 hour per keyboard usual. The most drastic adjustments resulting in a pile of wood shavings on the floor might only need to be made on the first visit to an instrument.
 CAREY BEEBE |
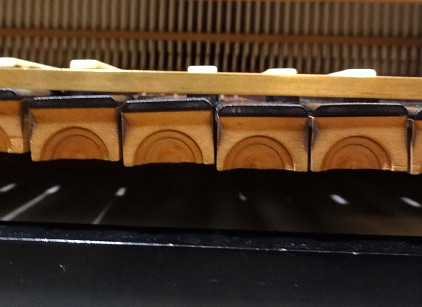
| Many of the lower manual keys in this Brazilian-made harpsichord were clearly doing a Samba towards the bass |
Tilt
The playing surface of all the natural and accidental keys must be absolutely level, not tilted to the left or right. Any discrepancy is easily noticed when a light weight straightedge is placed at the front of the keys. (The back of the keys may require weighting with a suitable length of wood like the jackrail or nameboard batten.)
This is the first adjustment to make, because it affects all subsequent processes.
The tilt of an individual key is adjusted by bending its balance pin slightly in the opposite direction to the tilt. For example, to correct keyheads leaning towards the bass as shown in the picture opposite, the top of each balance pin must be knocked slightly to the treble. The key may no longer work freely because it could now being binding at its back, or perhaps the treble side of the key has now been brought too close to its neighbour.
When the tilt is corrected across the entire keyboard, the next step in the alignment process can be considered.
 CAREY BEEBE |
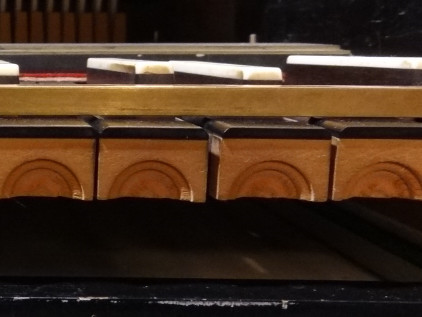
| Clearly visible spacing discrepancy of the natural heads |
Spacing
The naturals are always spaced before the sharps. There should be even clearance either side of the natural keyheads when viewed from the front.
Spacing is adjusted according to the system of the keyboard. For a traditional French lower manual guided by soft metal guidepins projecting from the rear of each key to work in a slotted rack, the guidepin can be bent slightly towards the same direction you wish to swing the head of the key. For example, the keyhead which has had its tilt adjusted as above, might now be swung towards the bass by bending its guidepin towards the bass. The guidepins need to exit the keytails almost square, otherwise they risk jamming in the rack. Better results can often be obtained by cranking the pin into a dogleg, or even relocating it to a more appropriate position in the keytail so its exits square to work freely in the rack.
If there is then insufficient space at the rear of the key for free operation, the appropriate side of the spaced key or its neighbour may require planing and/or the keyend cloth trimming.
The traditional French upper keys are guided by soft metal pins set vertically in the backrail and penetrating each key near its tail. In a nicely made keyboard, the guidepin mortises are cut so they only make contact with the guidepin at the very top of the keylever. This enables effective adjustment by cranking the guidepin so the length of the pin which bears on the key can remain vertical and therefore enable the key to track vertically when played without interfering with its neighbours.
When all the naturals are spaced evenly at their heads, the accidentals can be attended to. Sighting down from the top, each accidental should be centered in the available space between the natural tail coverplates. Again, some adjustment may be required to the clearance to the appropriate sides of the rear of the keys when this is done.
Sometimes it is better to break the solid accidental off the keylever and reglue it in an improved position.
The keys are now all checked to ensure they return unhindered, bearing in mind the keydip.
 CAREY BEEBE |
| Leveling in progress for an upper manual in Tainan, Taiwan |
Level
Finally, the level of the keys can be ascertained with the straightedge placed at the front of the playing surface of naturals and accidentals in turn. Any low keys can be easily identified by sighting from the front, the clear space between the keytops and the bottom of the straightedge obvious. The low keys are brought up to level by the insertion of thin paper punchings as necessary under each cloth balance punching. These paper punchings—identical to those used by modern piano technicians—are graduated in various color-coded thicknesses for convenience.
A keyboard substantially out of level will require far more thick card punchings than a quieter keyboard, which might only require a few of the very thinnest. The likely punchings can be temporarily placed on top of each key requiring raising. When the entire keyboard has been worked across, the straightedge can be removed and the paper punchings transferred under the cloth balance punching for each key in turn. The keyboard can be passed over a couple of times in this manner, making finer and finer adjustments until the keys are absolutely level.
The job of alignment is then complete and the keyboards can be returned to the instrument and action reinstalled.
| Technical Library overview | |
| Harpsichords Australia Home Page |