Technical Library

ACTION VI: Replacing a broken quill

Entire Contents Copyright © 2010 CBH
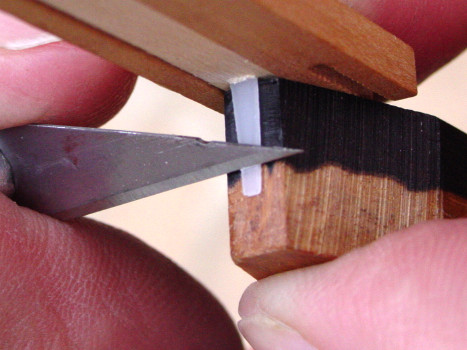
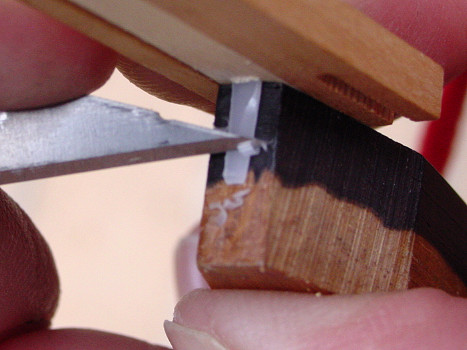
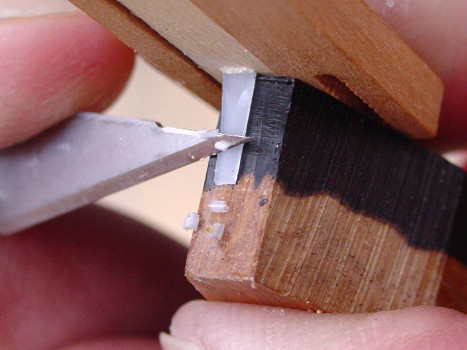
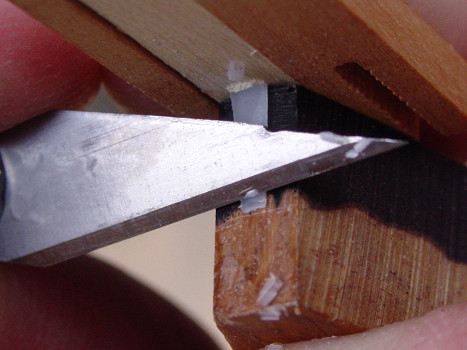
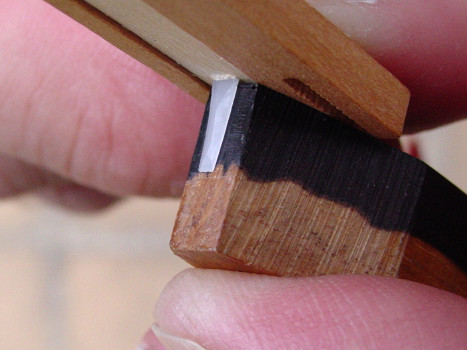
Next 1K gifBack 1K gif

Assembling your tools…
I am not going to write a thesis on how to initially setup an instrument here, nor how to completely revoice one that has been playing for some time. Rather, let’s concern ourselves with your present emergency—how you can replace a broken quill and get your note working again with a minimum of fuss.

Firstly, you’ll need to collect some tools, if you haven’t done so already. I hope the maker of your instrument has at least given you a few spare quills: Be sure to match the plectra material, and not use Celcon to replace odd quills in an instrument which was originally voiced in Delrin.

For safety, always support your quill on a block. Any endgrain hardwood block is fine—we often use rejected sharps. Work with the sharpest of knives under good lighting conditions. Most surgical scalpels are a bit too flexible at the tip— I far prefer an X-Acto hobby knife with a #11 blade. The blades dull rapidly, so keep a few fresh ones on hand. You'll also need some means of removing the stub of the broken quill from the tongue, and reinserting the new blank.

  • Spare quills
  • Voicing knife
  • Spare blades
  • Voicing block
  • Small needle nose pliers
  • Fine jeweller’s screwdriver

You’ll find many useful materials and tools on our Spare Parts page.

Removing the dead quill
A pair of fine pliers is very handy for this task—Malcolm Greenhalgh, our agent in London, gave me a nice German-made pair with lovely flat jaws. Made for electronic component work, they are also great for pulling nasal hairs: Some people use tweezers instead. The quill was probably wedge-shaped to begin and inserted from the back of the tongue, so it must be removed that way to avoid damaging the tongue.

Support the back of the tongue while you grab the remaining stub of the quill, and push firmly.

If there is nothing to grab hold of, you will have to do some operating from the front, perhaps using the tip of the fine jeweller’s screwdriver. Go easy, because you do not want to split either a wooden or plastic tongue, nor make the hole so large that the quill is going to slop around—the last thing you want is for it to fall out when you play.

Inserting the new quill
Find your packet of quills, and observe that they are cut in little wedges for you to insert from the back of each tongue. Hold the jack body face away from you, and feed a quill into the tongue mortice until it is tight and there is only a little remaining at the back of the tongue which we can bother about slicing off later if need be. It was the late Neil Roberts of the Harpsichord Center in Los Angeles that first alerted me that Celcon has a definite top and bottom surface—have the rounder corners and shiny surface facing upwards.

This is a good time to check that the jack is in its correct slot: Often the top jack has been pinched to get a note in the midrange playing in an emergency, but if you keep doing that instead of fixing the problem, pretty soon the whole instrument becomes unplayable!


Cutting harpsichord delrin plectrum to length 50K jpeg

Cutting to length
Your quill blank is probably too long.

Turn the jack upside down to lay the quill flat on the end of the voicing block, using your thumb to press against the back of the jack with enough pressure to hold it against the block. I’ve removed the damper for ease of access, although you can see my voicing block is shaped to allow me to voice without the damper getting in the road, if I wanted.

With your sharp voicing knife placed at about the right position on the quill, press down at a slight angle heading away from the block, and you will find that the tip of the quill will just snap off. Wear some eye protection, or at least close your eyes when you snap because you don't want to have to fish tiny bits of plastic out of them before you’re finished.

Your choice of angle makes a bevel under the tip of the quill that will help it slip past the string on its return. It may take several attempts to get the quill cut to the right length: Drop it back into the instrument frequently and see how you are going, comparing it with adjoining notes. Always cut the end of the quill absolutely parallel with the face of the jack.

If you cut a quill too short, it can be pushed forward ever so slightly, or simply reversed out of the tongue and replaced with a new one. You will need your small pliers or tweezers for this, and don’t hesitate to replace a quill you have cut badly.


Initial voicing
Now you must make the tone and touch of your replacement match the surrounding notes, by voicing the quill.

All your voicing is done on the underside of the quill.

Begin whittling away on the arrises of the quill, first on one side, then the other. Cut away from yourself, positioning your fingers so they won’t be sliced!

If you are doing it right, the Delrin or Celcon will shave off in tiny curls: It’s all in the angle you hold the blade. If you dig too deep, you are trying to take off too much at once, and you'll end up carving a hollow in the side of the quill. Flatten the angle of your blade for better results.

Initial voicing of harpsichord plectrum 45K jpeg

Preserving the shape of harpsichord plectrum 53K jpeg

Preserving the shape
Now slice the other under arrise of the quill, to make it match your first side.

Fight to maintain the full width of the quill when you look down on it—this will give you the greatest fundamental to the tone. The shaving of the corners creates a triangular section in the quill for strength, with a thick central ridge.

Once you have cut away the corners on the underside, your cuts will begin to narrow the top of the quill, so keep that blade flat!

Keep dropping the jack back in the instrument to check your progress, making both the tone and the touch of your replacement quill match the surrounding notes.


The final bevel
Now for the all-important bevel at the tip, to ensure the quill is going to want to flip below the string on its return.

Make this shaving in one cut with the angle of the knife almost flat, and you are done.

Final bevel at the tip of harpsichord plectrum 48K jpeg


Finished harpsichord plectrum 45K jpeg

The finished quill
And that is all there is to it.

Reinsert your damper, return your jack to the instrument and you are done.


Many thanks to the nerdy tenor Daniel Hutchings for the macro photographs on this page,
taken during a spare moment at the 2002 Carmel Bach Festival.


Movie thumb 2K jpeg Movie 1K gif Replacing a delrin quill
Carey Beebe demonstrating replacement of a delrin quill.
YouTube logo 2K gif


Action index:


CBH Icon 1K gif Technical Library overview
CBH Icon 1K gif Harpsichords Australia Home Page